Smile Line Filler Before and After For CapCut Clean Guide
Smile Line Filler Before and After For CapCut is a popular editing style used by clinics, beauty creators, and social media editors to show clear visual results. These videos focus on natural improvement, not exaggeration. With short-form content rising, creators want edits that feel honest and professional. That is why CapCut is often chosen for this work.
Today, viewers trust visuals more than words. Smile Line Filler Before and After For CapCut helps present results clearly by placing “before” and “after” clips side by side or in smooth sequence. Honestly, when editing stays clean and simple, it builds confidence and keeps viewers engaged.
Smile Line Filler Before and After For CapCut Explained Simply
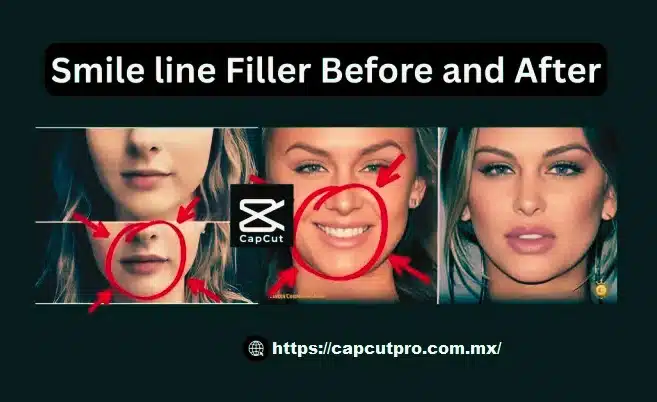
This editing style shows two stages of the same face. One clip shows the face before treatment. The next shows the face after treatment. The goal is clarity. The edit should help viewers notice soft changes without heavy effects.
CapCut makes this easy with simple tools like split screen, fade, and text labels. Honestly, clean editing looks more professional than flashy effects. When viewers can compare naturally, they trust the result more.
Why Smile Line Filler Before and After For CapCut Is Popular
Many clinics and beauty pages post short videos daily. They need fast editing that still looks professional. CapCut fits this need well because it is easy and quick to use.
Social platforms prefer short videos. Creators can edit on phones and publish fast. You know, when time matters, CapCut becomes a practical choice for before and after content.
Smile Line Filler Before and After For CapCut Editing Style
The most common style is split screen. One side shows “before” and the other shows “after.” This helps viewers compare instantly. Another style is a smooth fade transition from before to after.
Editors should keep colors natural. Avoid heavy smoothing. Well, natural skin texture builds trust. Simple text like “Before” and “After” is enough.
Common Mistakes in Smile Line Filler Before and After For CapCut
A big mistake is using strong beauty filters. This can make results look fake. Viewers notice this quickly and may lose trust.
Another mistake is mismatched angles or lighting. If lighting changes, results feel misleading. Honestly, same angle and same light are very important for fair comparison.
Devices and CapCut Versions Used for Before After Editing
Many creators edit on phones using CapCut for Android and CapCut for iOS. Mobile editing is fast and fits social media needs. For larger projects, editors prefer CapCut for PC or CapCut for Mac because of bigger screens and better control.
Some users explore CapCut Pro for advanced tools. Others search CapCut Pro APK, CapCut Mod APK, or CapCut Pro APK Download online. Some even try CapCut Old Version. For safety and stability, CapCut Pro APK Download Latest Version from official sources is always the better choice.
Tips to Make Smile Line Filler Before and After Videos Look Natural
Use the same camera angle in both clips. Keep facial expressions relaxed. Natural light works best for skin clarity.
Add gentle transitions. Avoid fast zooms. Text should be small and clean. You know, when editing feels calm, results feel honest and professional.
Conclusion
Before and after videos play a big role in beauty content. Viewers want truth, not over-editing. Clean visuals help build trust and credibility.
CapCut makes this process simple for beginners and professionals alike. With careful editing, results can look clear and natural.
So well, if you are creating Smile Line Filler Before and After For CapCut videos, focus on honesty and balance. Simple edits always perform better in the long run.
Frequently Asked Questions
Q1. What is Smile Line Filler Before and After For CapCut?
It is an editing style that shows smile line filler results using before and after visuals edited in CapCut for clear comparison.
Q2. Why is CapCut good for before and after videos?
CapCut is easy to use, fast, and supports split screen and transitions that are perfect for before and after edits.
Q3. Which format looks most natural for before and after?
Split screen or slow fade works best. Both allow viewers to compare without distraction.
Q4. Can beginners edit before and after videos in CapCut?
Yes, CapCut is beginner-friendly. Basic tools are enough to create clean and professional before and after videos.
Q5. Should filters be used in cosmetic before and after videos?
Heavy filters should be avoided. Natural lighting and minimal correction give more honest results.
Q6. Is the free version of CapCut enough for this editing?
Yes, the free version is usually enough. Pro features are optional, not required, for clean before and after edits.